


Split Payments: Use Credits + Bank + Card, All in One Go
Explains how to make payments via merchant credits, linked bank accounts, and cards

If you’ve ever wondered, “Can I use my credits, bank account, and card – all at once to make smarter payments?” — you’re in the right place.
With OnestPay™, split payments are finally simple and smooth. Whether you’re shopping, gifting, or donating — you now have the freedom to choose how you pay.
We built this guide so you can walk through the full process— from using credits to linking your card and bank account — making sure you get the most flexibility every time you check out.
Let’s dive in.
Why We Stand Out?
It’s not just spending. It’s smart financial freedom, with total control.
- Use Credits, Bank & Card – Together, in One Transaction
- Buy, Gift, Trade & Donate Seamlessly
- Peer-to-Peer Credit Marketplace
- Donate with Zero Processing Fees
Now let’s walk you through how split payments work with OnestPay™.
01 Use Credits First
1.1 Buy & Load Merchant Credits with OnestPay™ Digital Wallet
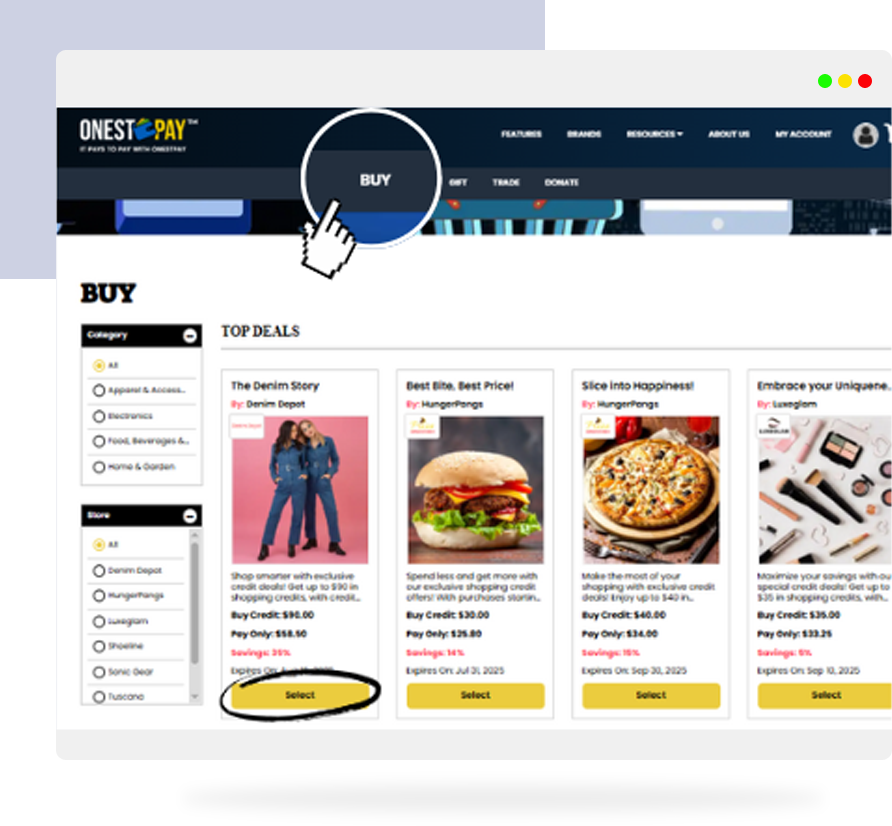
1.1.1. Select Deals
- Log in to your OnestPay™ account
- Head to the Buy section
- Browse top deals from trusted merchants.
- You can see: Credit Amount, Amount Payable, Savings and Expiry Date
- Click on ‘Select’ for the option you prefer..
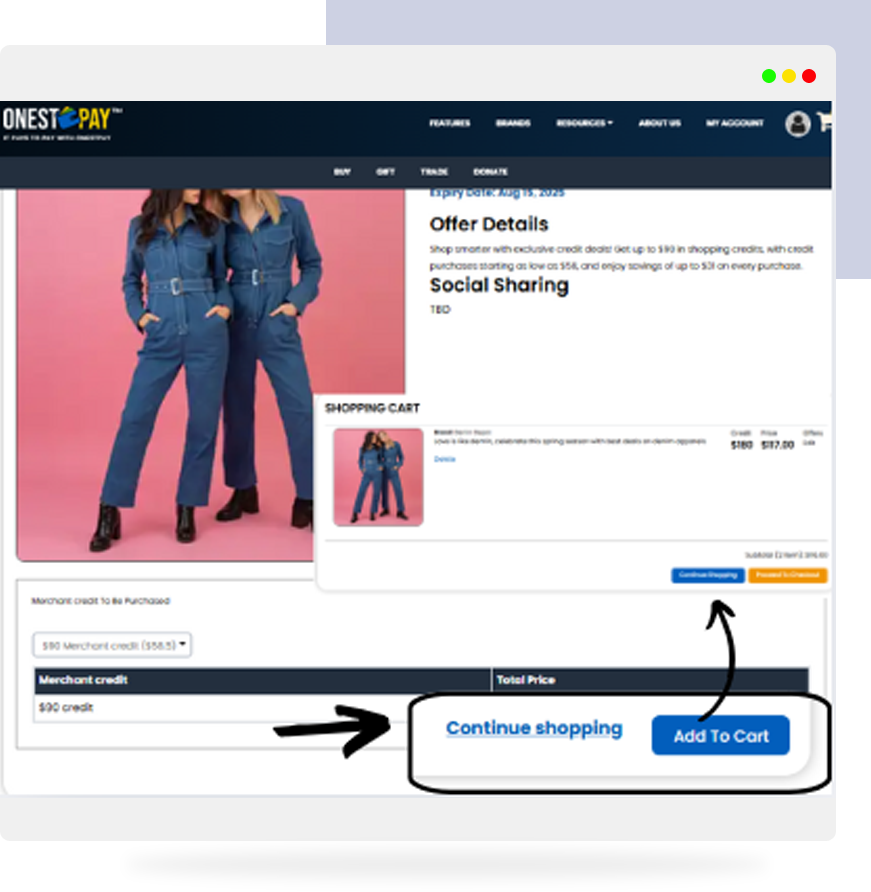
1.1.2 Add To Cart
- When ready, click ‘Add To Cart’. Go to Shopping Cart, then ‘Proceed To Checkout’
- You can also click ‘Continue Shopping’ for more options.
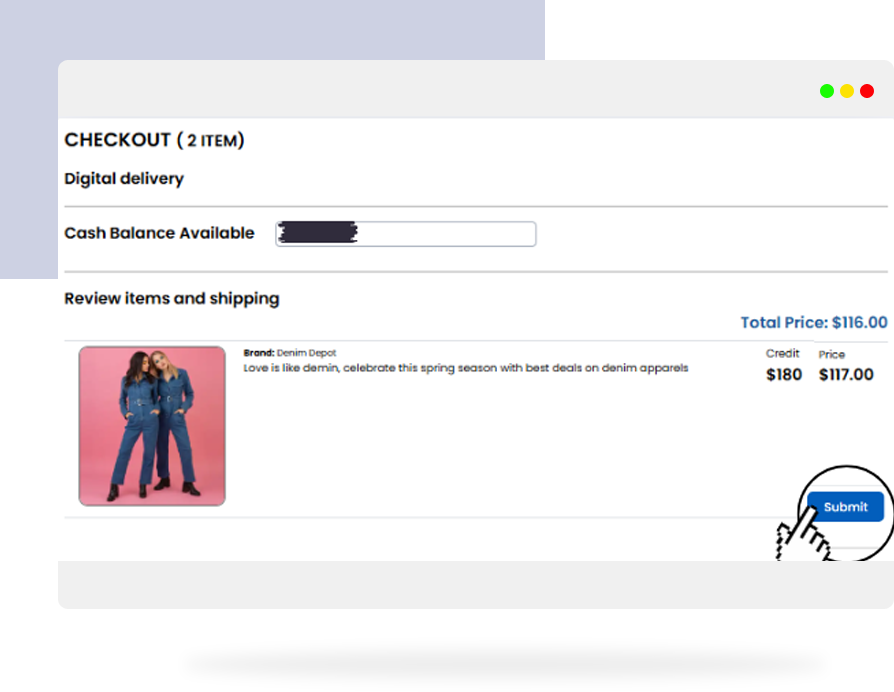
1.1.3 Add Credit
- Review your purchase, Available Cash Balance, Total Price,
- Click ‘Submit’ — and credits are yours!
Pro Tip: Deals often have expiry dates. Use them before they vanish!.
1.2 Gifting Credits in OnestPay™ – Made Super Easy
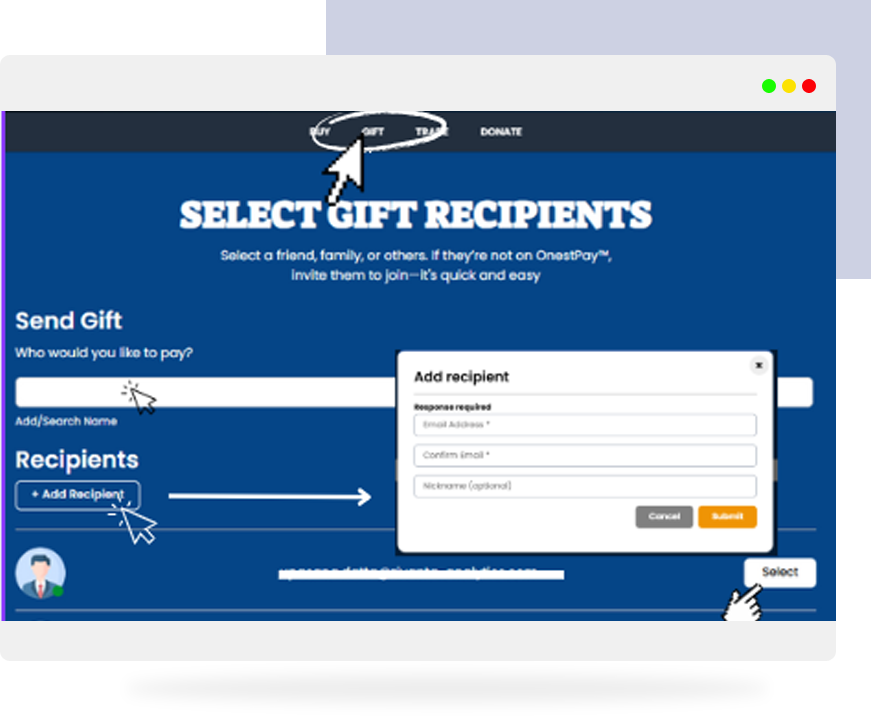
1.2.1. Select Recipient
You can send wallet credits to friends or family in simple steps:
- Scroll to the Gift Page
- Choose a recipient — search by name or invite someone new.
- To invite click on ‘Add Recipient’. You will be redirected to the Add Recipient Write the email address and click on ‘Submit’
- If your friends are using OnestPay™, click on ‘Select’.
1.2.2 Gift Your Friend
A ‘Create Gift Basket’ window will then appear.
Pick how to gift:
Gift Now With My Wallet Credits
- A ‘Merchant Credit’ window will appear showing a Merchant Credit Summary across different stores.
- Click on ‘Select’ for the store from which you want to gift credit.
- Enter the amount of credit you wish to gift.
- Click on the Gift icon to proceed.
Buy New Merchant Credits to Gift (Redirects you to Buy Page)
That’s it — your gift is sent, fee-free, and full of heart.

1.3 Trade Credits – Buy or Sell
Ready to hustle a bit? Here’s how to trade like a pro:
1.3.1. Buying Credits:
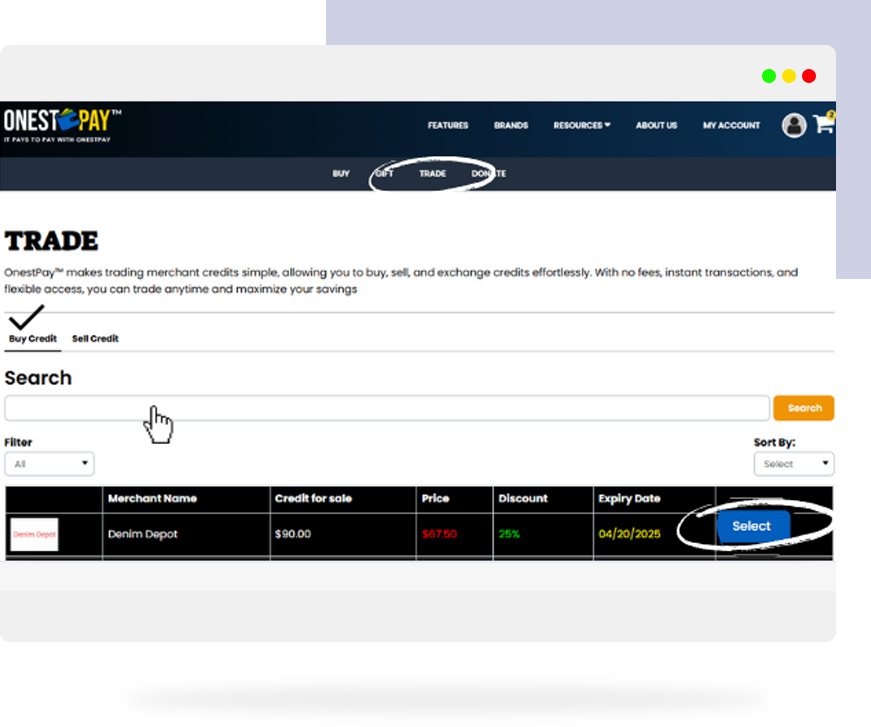
- Go to the ‘Trade’ Page
- You can see two tabs: Buy Credit and Sell Credit
A. Search Merchant Credits
- Under the ‘Buy Credit’ tab, browse available credits by merchant
- Use the Search bar or Filters to find the best deals
- Click Select
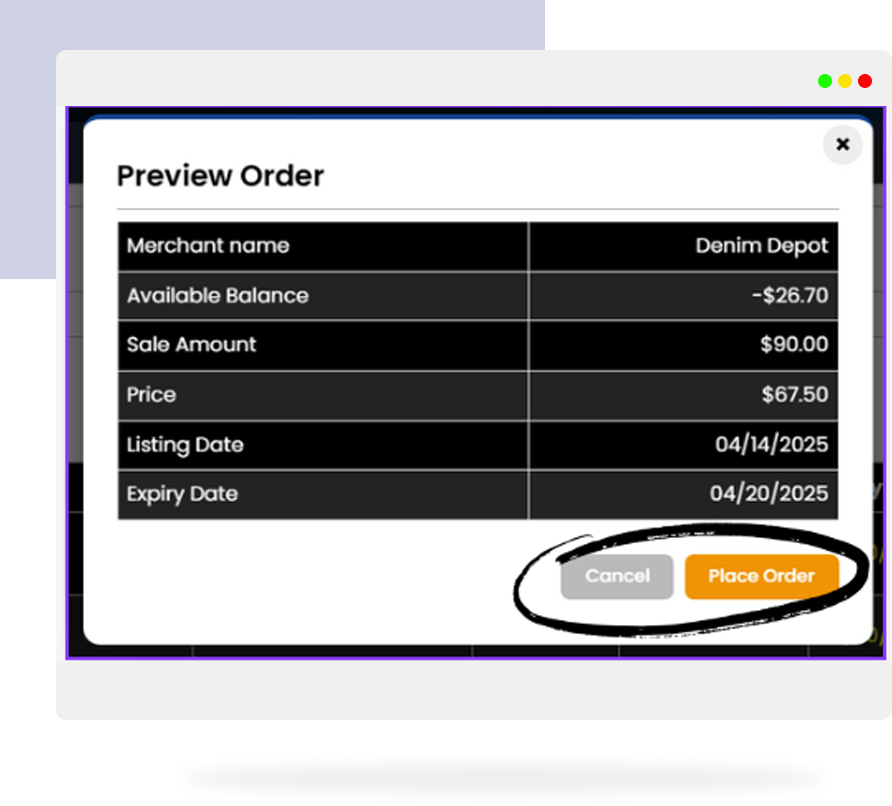
B. Preview and Purchase
A Preview Order window will appear displaying the following details:
- Merchant Name
- Available Balance
- Sale Amount
- Price
- Listing Date
- Expiry Date
After reviewing the order, you can choose to:
- Cancel the order by clicking on ‘Cancel’
- Proceed by clicking on ‘Place Order’ to finalize your purchase.
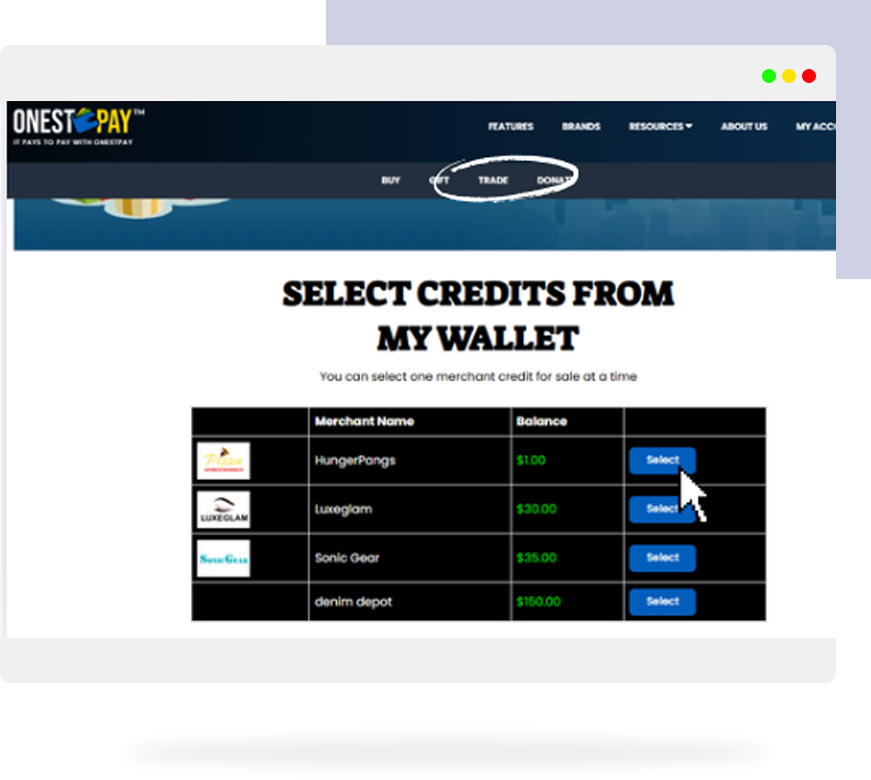
1.3.2 Selling Credits
- To sell credit, click on ‘Sell Credit’.
- Scroll down to the ‘Select Credits from My Wallet’
- You’ll see a list of merchant names and their available balances.
- Select one merchant credit for sale at a time.
- Click on ‘Select’ next to the credit you want to sell.
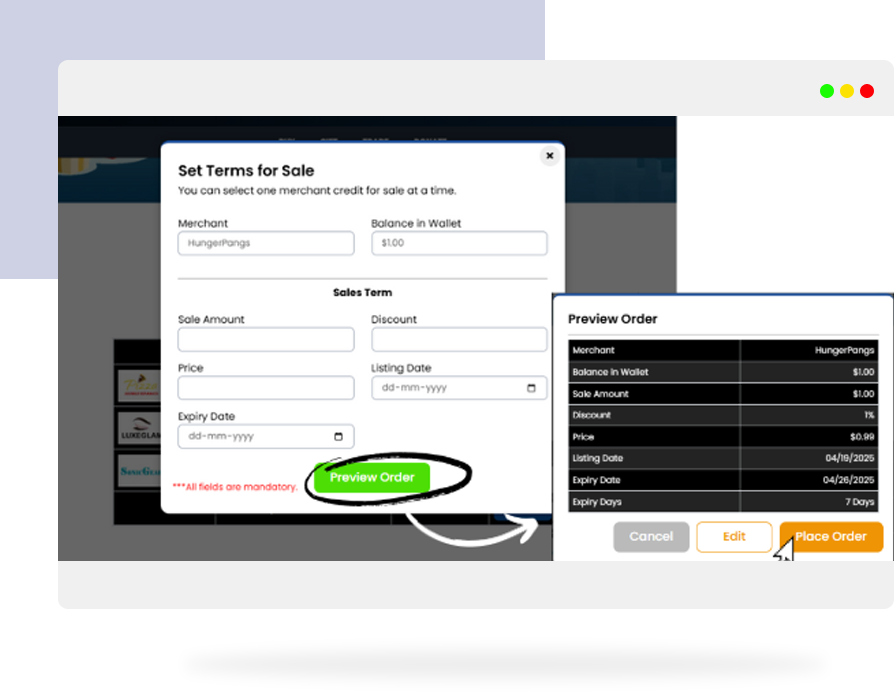
A. Preview and Place Order
A window titled ‘Set Terms for Sale’ will appear where you can:
- Enter the Sale Amount
- Enter the Discount
- The Price will auto-calculate based on the discount
- Set the Listing Date
- Set the Expiry Date
- Click on ‘Preview Order’.
A Preview Order page will open showing:
- Merchant Name
- Balance in Wallet
- Sale Amount
- Discount
- Price
- Listing Date
- Expiry Date
- Expiry Days
You will now have 3 options:
- ‘Edit’ to change the terms of the sale
- ‘Cancel’ to stop the process
- ‘Place Order’ to confirm and proceed with the sale
Real-time, peer-to-peer. No hidden fees. That’s how trading should be.
1.4 Donate Credits to Causes That Matter
Let’s give back — one credit at a time.
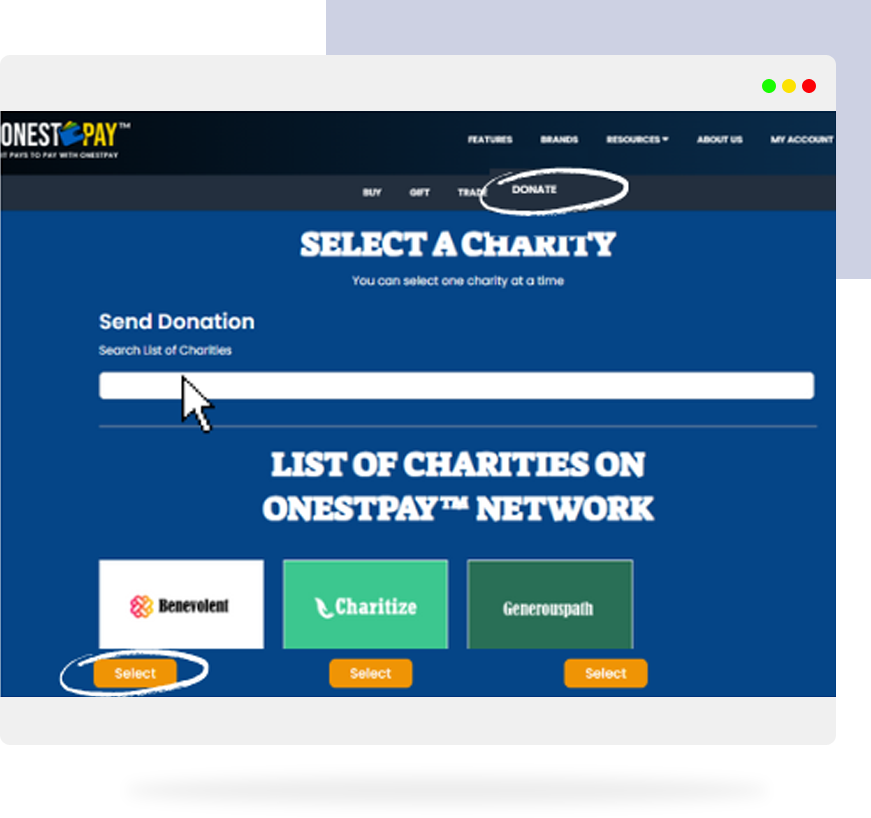
1.4.1. Select Charity
- Go to the ‘Donate’
- Scroll down and select a charity (only one can be selected at a time).
- Use the search bar under Send Donation to find a charity.
- Scroll a bit. Click the ‘Select’ button next to your chosen charity.
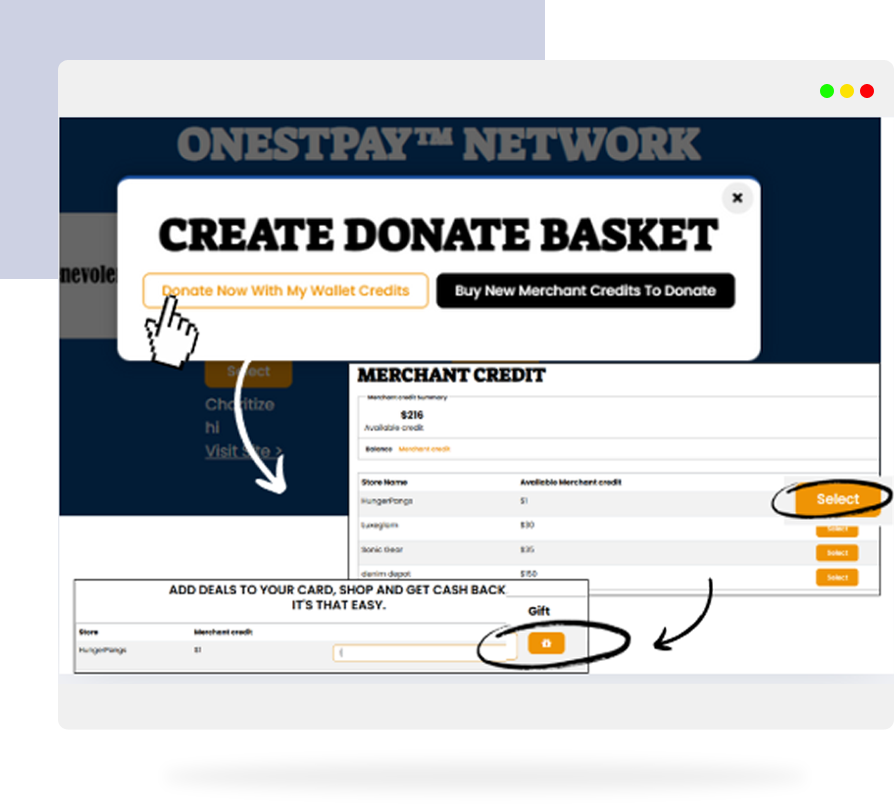
1.4.2 How To Donate
A ‘Create Donate Basket’ window will appear with two options to choose from:
- Donate now with my wallet credits
- Buy new merchant credits to donate
If you choose ‘Donate now with my wallet credits’:
- You’ll be redirected to the Merchant Credit page: (A summary will appear showing Available Credit across different stores.)
- Click ‘Select’ for the store whose credit you want to donate.
- Enter the amount of credit you wish to donate.
- Click the Gift icon to proceed.
If you choose ‘Buy new merchant credits to donate’:
- Click on ‘Buy New Merchant Credits To Gift’.
- You’ll be redirected to the Buy page.
02 Link Bank Account + Debit Card
Credits are powerful, but what if we want to go further?
With OnestPay™, you can split your payments across wallet credits, bank funds, and cards — seamlessly. Here’s how to set it up.
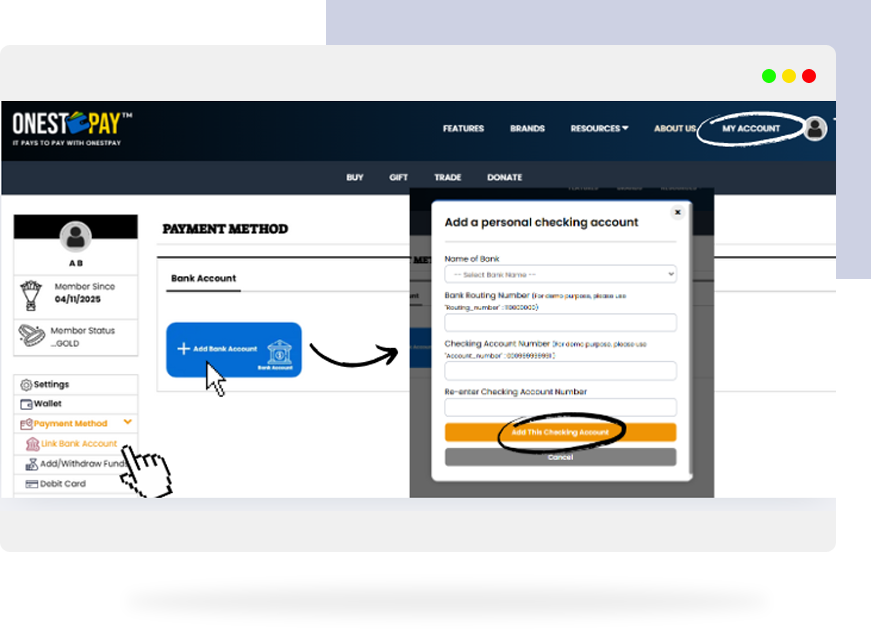
2.1. Link Your Bank Account
Linking your bank allows you to top-up or split payments directly from your balance.
- Go to My Account.
- In the left panel, Click on Payment Method.
- A drop-down menu will appear with three options: Link Bank Account, Add/Withdraw Funds, and Debit Card.
- Click on Link Bank Account.
- Click on Add Bank Account.
A window titled Add a Personal Account will appear.
Fill in the following details:
- Name of Bank
- Bank Routing Number
- Account Number
Click on Add This Account.
Your bank account is now successfully linked.
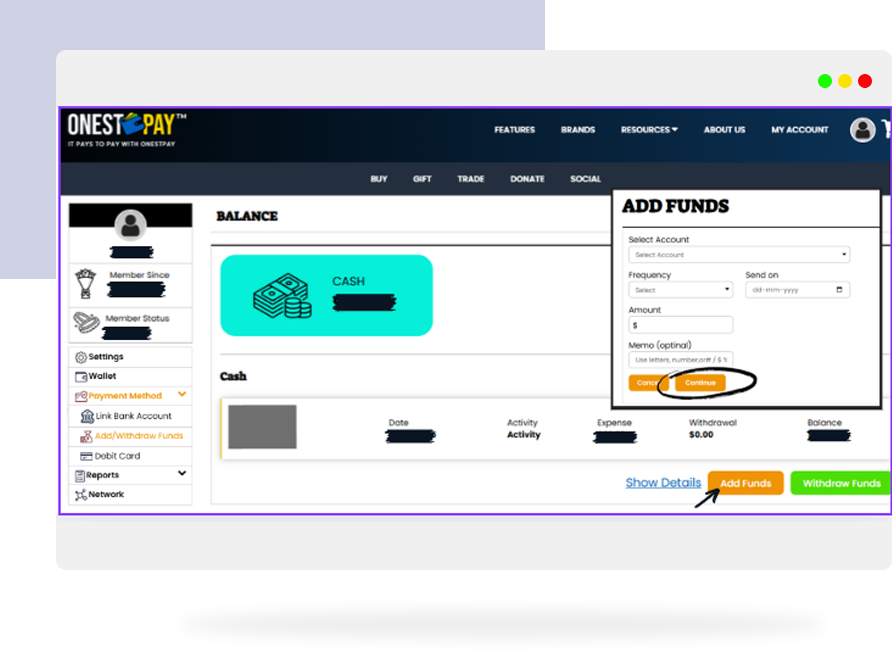
2.2 Add / Withdraw Funds via Your OnestPay™ Account
2.2.1 Click on Add/Withdraw Funds
Select Add or Withdraw Fund
You’ll see a Balance section that displays:
- Available amount in your wallet under the Cash section
- A table showing Date, Activity, Expense, Withdrawal, and Balance
Below the Balance section, you’ll find three options:
- Show Details
- Add Fund
- Withdraw Fund
A. To Add Funds
- Click on Add Fund.
- A window titled Add Funds will appear.
Fill in the following:
- Select Account
- Frequency
- Date
- Amount
Click Continue to proceed or Cancel to stop.
On the next screen (Review and Transfer), carefully check all details.
Click Submit to complete.
Funds have now been successfully added to your wallet.
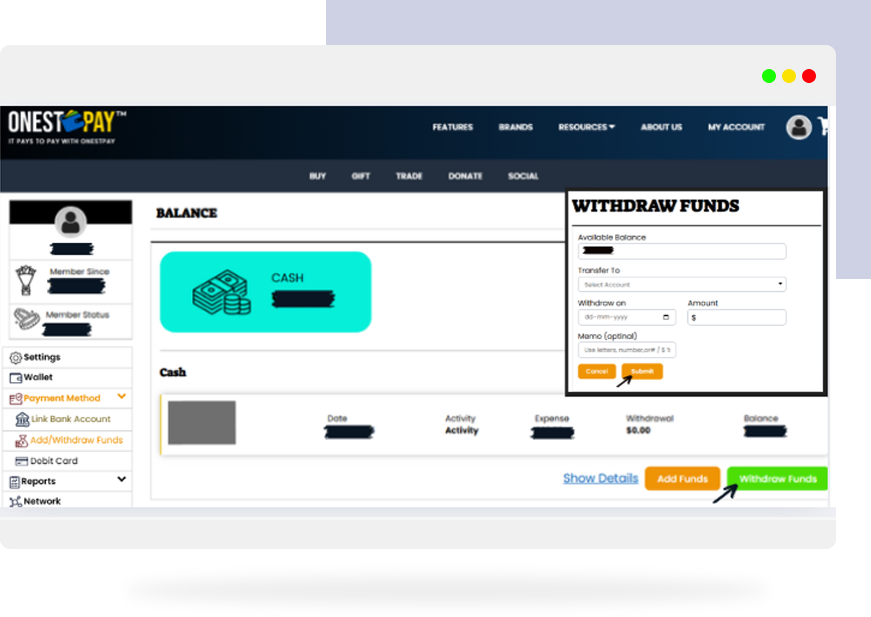
B. To Withdraw Funds
- Click on ‘Withdraw Funds’.
- A window titled Withdraw Funds will appear.
- You’ll see your Available Balance.
- Enter the following details:
- Select Account under Transfer To, Date to Withdraw On, Withdrawal Amount
- Click Submit to proceed or Cancel to stop.
Funds will now be withdrawn to your selected account.
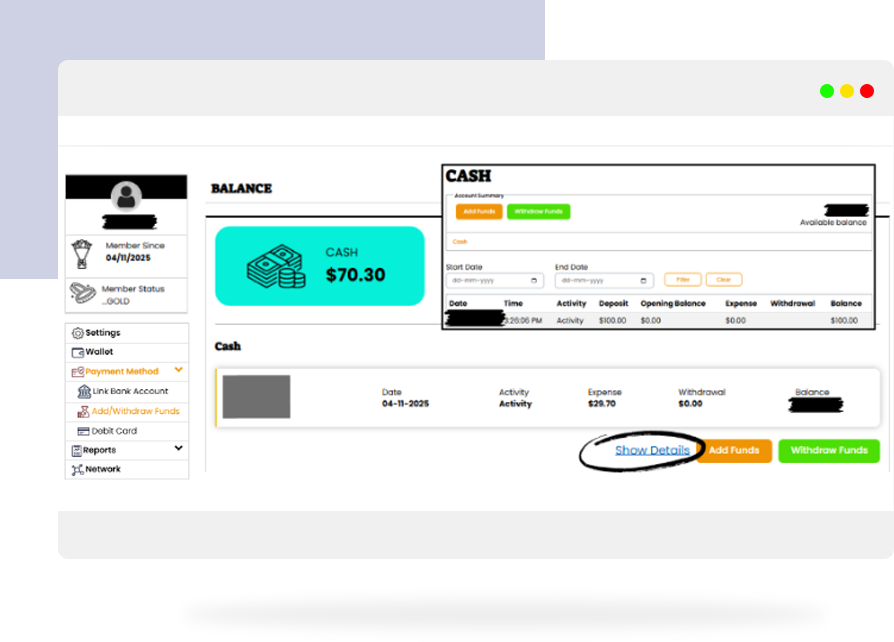
2.2.2 To View Transaction Details
- Click on ‘Show Details’.
- You’ll see a detailed activity report including Available Balance, Date & Time, Activity, Deposit, Opening Balance, Expense, Withdrawal, and Final Balance.
Confirm the transactions and track everything in your wallet.
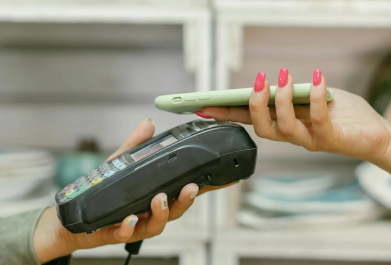
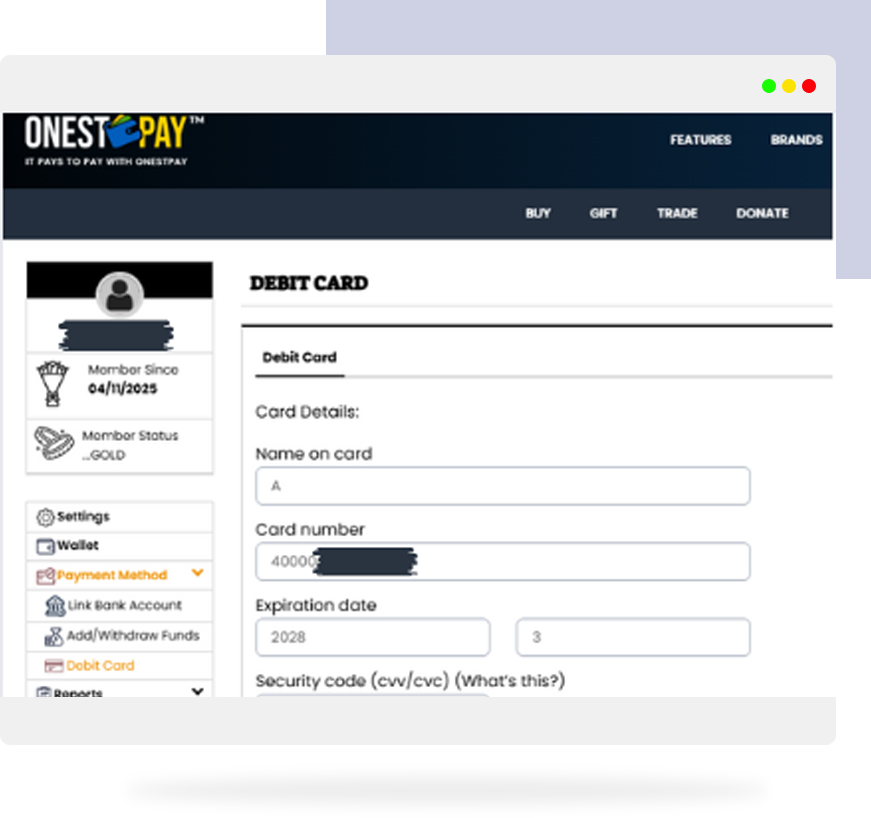
2.3 Link Your Debit Card
Some purchases need a quick swipe — or tap.
- Navigate to the Debit Card Page
- Add your card details securely
- Use it for top-ups or during checkout when credits aren’t enough
It’s that easy.
It Pays to Pay With OnestPay™
Using OnestPay™, you’re not locked into one payment method. In fact, you can split any transaction using:
- Your Wallet Credits
- Linked Bank Balance
- Linked Debit Card
This gives you unmatched flexibility at checkout, without needing to move funds around. Whether it’s a flash deal you don’t want to miss or a high-value gift you want to split — the power is in your hands.
So go ahead — load those credits, link your bank and card, and make your next split payment like a pro.
Head to onestpay.com now and take charge.